Here, i’ll guide you how to setup ssh so that you don’t have to worry about entering your credentials everytime or worrying about deprecated HTTPS notice in GitHub.
Table of Contents
- Motivation
- 1. Why Using SSH?
- 2. Generate New SSH Key
- 3. Configure Local SSH
- 4. Add SSH Key to Github
- 5. Test Your Key
Motivation
If you’re using git or github for a while and use the “traditional” HTTPS to modify or access your private repos, you may have this email on your inbox.
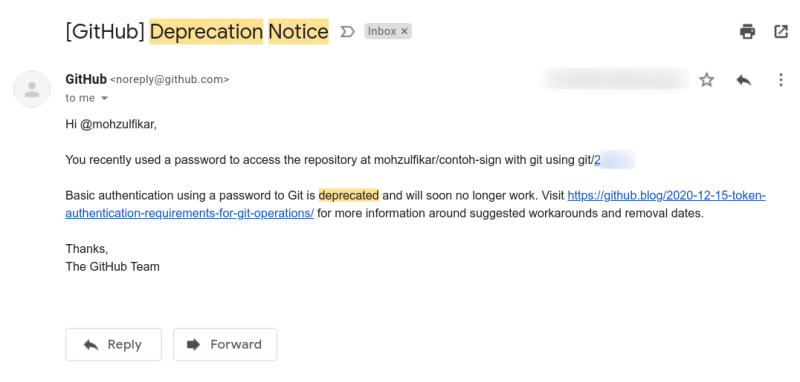
As you can see, this notification is because we use basic authentication using password (usually when we clone repo via HTTPS link). So beacuse password auth will be deprecated soon, we must use other method, there are 2 other methods github provided. Using personal access token over HTTPS or using SSH key. This post will explain the second one.
1. Why Using SSH?
So the question is, why use SSH instead of the other method? Well in my opinion, using SSH is very simple and more secure than using password. Also, you don’t need to store the token (because the token only given when we create it) which will also provide security hole if you accidentally expose your token like this or this.
But, this also comes with some price that you must create SSH key for each computer you want to use for developing an application (even if it’s on the same computer but different os you must store 2 keys). You can also create key with passphrase if you want to double the security. Anyway lets just jump right to the guide. BTW, apart from this guide you can also check the official docs in github.
2. Generate New SSH Key
For windows user, you can enable OpenSSH Client feature first. Read this guide for more details. If you encounter error in enabling the feature, just install git bash from this link, it should also work.
For Linux/Unix, OpenSSH is usually installed by default. Then, to generate new key, you can choose to use either rsa or ed25519 algorithm.
Using ed25519 or ecdsa 256 bit can generate shorter key but with the same security as 3072 bit rsa. If you want to use key for the long-term period, use 512 bit ed25519 or 15360 bit rsa (i prefer to use ed25519).
# use this
ssh-keygen -t rsa -b 4096 -C "insert your comments here"

# or this
ssh-keygen -t ed25519 -b 256 -C "insert your comments here"
After that, you should be prompted to enter the location of the key. I recommend you to just use the default (just press enter), but if you want to create custom key name make sure to also add them in ssh config file. I’ll give an example if you want to create custom name for the key.
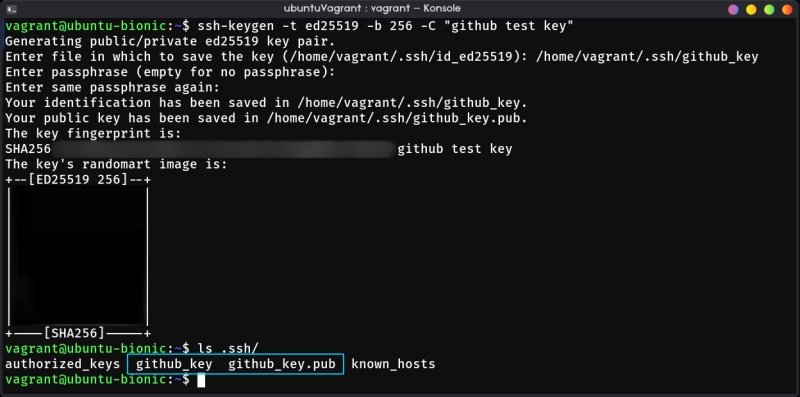
In this example, i create a key named
github_key.
3. Configure Local SSH
After we’ve successfully generate the key, we must tell SSH to use the key when we connect to github (for clone, push, etc.). Create config file in ~/.ssh directory and add this content to the file.
Host github.com
IdentityFile ~/.ssh/github_key
If you’re bash one-liner this is the command,
printf "Host github.com\nIdentityFile ~/.ssh/github_key\n" > ~/.ssh/config
Specify Host for a key is optional but this can make you manage your key neater.
4. Add SSH Key to Github
The last step is add your public part of the key (copy the file content that ends with .pub) to github. If you’re interested in learning about the concept behind this, watch this video or search about “public key crypto” or “asymmetric encryption”.
The public part of the key SHOULD BEGIN WITH the name of algorithm you use e.g. ssh-ed25519 or ssh-rsa NOT SOMETHING like ---BEGIN OPENSSH PRIVATE KEY--- or ---PRIVATE KEY---.

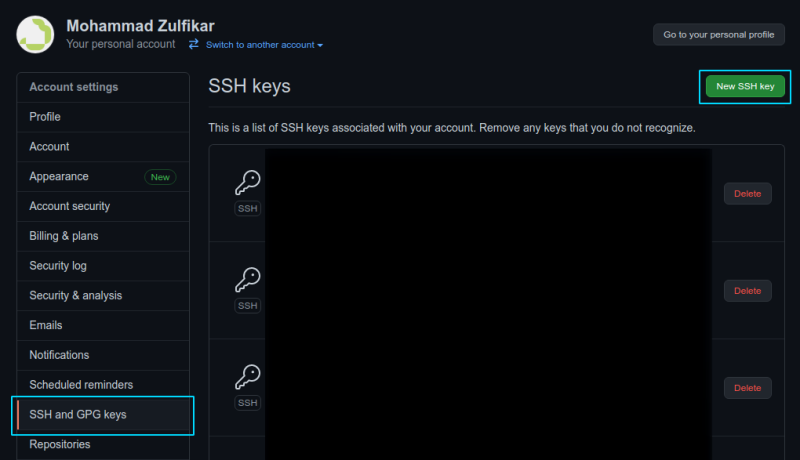
Go to your github setting and choose “SSH and GPG keys” section or just go to this link. Click “New SSH key”.
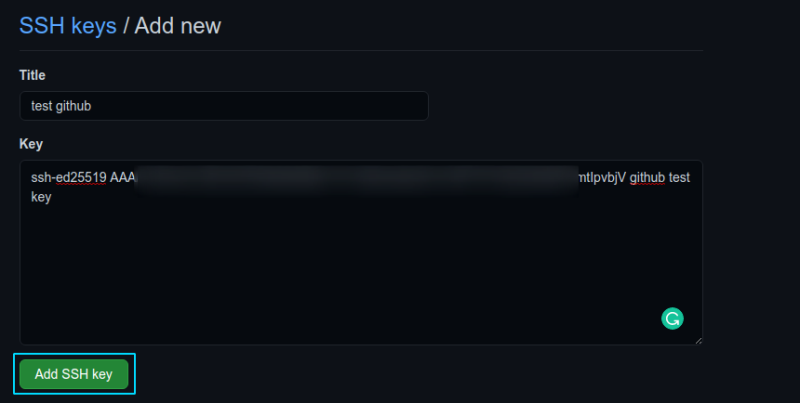
Paste your key to the text form and add title to your liking. Click “Add SSH key”.
5. Test Your Key
Now you can start using SSH instead of old, deprecated password authentication to start your work on github! :)
To test if your key are working properly, use this command
ssh -T [email protected]
You’ll be asked to verify the fingerprint of github public key. Check the fingerprint if it’s one of the fingerprint listed here. Type yes if it matches one of the fingerprint. It should produce the output “Hi your_username! You’ve successfully authenticated …”.
 .
.
If the fingerprint doesn’t match one of the list, you must be careful (your connection may be tampered by someone else, use another connection instead).
That’s it! I hope this post can help you setup SSH authentication for your github account. :)